DDDIQ
مدیر ارشد
آموزش نرم افزار ZBrush
تاریخچه مختصری از zbrush :
نرم افزار zbrush در سال ۱۹۹۹توسط شرکت Pixologic و در نمایشگاه SIGGRAPH رو نمایی شد ، همانطور که می دانید نمایشگاه SIGGRAPH معتبر ترین نمایشگاه و گردهمایی دنیای گرافیک می باشد که اکثر شرکت های بزرگ آخرین محصولاتشان را در آن نمایشگاه عرضه می کنند.اما با کمی تاخیر ورژن دموی آن در سال ۲۰۰۲ منتشر شد . بعد از آن ورژن ۳٫۱ نرم افزار زی براش در سال ۲۰۰۷ منتشر شد و در سال ۲۰۰۹ اعلام شد که ورژن ۴ این نرم افزار به بازار خواهد آمد اما انتشار این نسخه به تعویق افتاد و در عوض آن ورژن ۳٫۵ با بعضی از ویژگی هایی که برای ورژن ۴ در نظر گرفته بود وارد بازار شد. آخرین نسخه این نرم افزار در حال حاضر نسخه ۴R6 می باشد .
کاربرد نرم افزار zbrush:
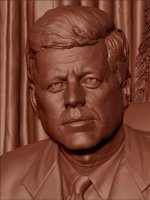
در بعضی از سایت ها به اشتباه از این نرم افزار به عنوان نرم افزار انیمیشن سازی نام برده می شود که کاملا اشتباه است . نرم افزار zbrush برای sculpt (حجاری کردن) بر روی مدل می باشد . و البته با توسعه این نرم افزار امکان مدل سازی در نهایت کیفیت و جزییات از شروع تا پان در آن گنجانده شده است . اما در نسخه های نخستین آن مدل سازها در نرم افزارهای دیگر مدل خود را می ساختند و برای افزایش جزییات مدل را وارد نرم افزار زی براش می کردند و به مدل های خود جزییات دقیقی را اضافه می کردند اما با توسعه این نرم افزار ، ساخت انواع و اقسام مدل ها به راحتی در آن صورت می گیرد.البته این کار هنوز هم عرف است ، به طور مثال شما کلیت چهره یک فرد مسن را در ۳d max یا maya یا هر نرم افزار دیگری مدل سازی می کنید ، اگر با این نرم افزارها کار کرده باشید می دانید ساخت کلیت یک چهره کاره ساده ای است اما برای طبیعی شدن و بهتر شدن مدل می بایست چین و چروک هایی به مدل خود اضافه کنید ، که این کار در نرم افزارهای مثل تری دی مکس و مایا هم کار بسیار پیچیده ، سخت و زمان بر می باشد ، علاوه بر این شما برای اضافه کردن جزییات می بایست تعداد poly های مدل را بالا ببرید که در آن نرم افزارها باعث کند شدن شدید سیستم می شود . بنابراین مدل سازهای حرفه ای بعد از ساختن base کار در هر نرم افزاری (همانطور که گفتم در خود نرم افزار زی براش هم می توانید چنین کاری را انجام دهید یعنی یک مدل را از ابتدا تا انتها به راحتی بسازید) مدل خود را وارد zbrush می کنند و در زیبراش به راحتی ! و درکمترین زمان ممکن ! بهترین و کاملترین و با کیفیت ترین جزییات را به مدل خود اضافه می کنند .به عکس زیر و جزییات آن دقت کنید ، جزییات پوست بدون نرم افزار زیبراش امکان پذیر نمی باشد.
http://www.www.www.iran-eng.ir/attachment.php?attachmentid=250691&d=1440766863
http://www.www.www.iran-eng.ir/attachment.php?attachmentid=250690&d=1440766832
اما زیبراش یکسری الگوریتم ها و تکنیک ها دارد که جزییات مدل را بدون افت سرعت سیستم تا آخرین حد ممکن بالا می برد تا بتوانید به راحتی جزییات دلخواه خود را به آن اضافه کنید . زیبراش این کار را با ترکیب تکنیک های ۳D و ۲٫۵D انجام می دهد . در مورد مفهوم ۲٫۵D در درس های آینده توضیح خواهم داد .
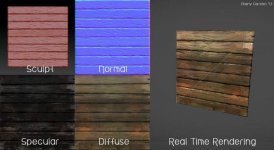
یکی دیگر از کاربردهای مهم زی براش استفاده در تکسچرینگ و مخصوصا بحث texture در موتورهای بازی سازی می باشد . در موتور های بازی سازی شما نمی توانید از مدل های high poly یا با کیفیت بالا استفاده کنید (علت های مختلفی دارد که در بحث آموزش ساخت بازی به آن خواهیم پرداخت). و بخاطر رندر real time و سرعت های مختلف کامپیوترهای استفاده کنندگان می بایست تا جایی که امکان دارد از مدل های low poly یا کیفیت پایین استفاده شود ، اما چگونه است که بازی های امروزی ، با کیفیت خیلی زیاد در دسترس است؟! راز این قضیه در استفاده از تکسچرهای با کیفیت می باشد ، در واقع شما می توانید مدل low poly خود را وارد zbrush کنید و آنجا مدل را به کیفیت بالا تبدیل کنید ، سپس جزییات و تکسچرهای مورد نظر خود را بر روی مدل تنظیم کنید و از لایه های مختلف تکسچر مانند diffuse , bump , normal bump و …. رندر و خروجی گرفته ، و همان تکسچرها را در موتور بازی یا نرم افزارهای دیگر بر روی مدل خود بیاندازید ، با این کار علاوه برا ینکه حجم زیادی از منابع کامپیوتر (مانند ram ، سرعت پردازش cpu و … که در بحث بازی سازی خیلی مهم است ) را نمی گیرید ،با همان مدل low poly کیفیتی نزدیک به مدل با جزییات بالا (high poly ) خواهید داشت .
عکس زیر یک مدل را در حالت های Low poly و high poly می بینید :
http://www.www.www.iran-eng.ir/attachment.php?attachmentid=250693&d=1440767150
و در این عکس یک متریال با کیفیت زیاد و البته کم حجم برای استفاده در انیمشن یا موتور بازی می بینید :
http://www.www.www.iran-eng.ir/attachment.php?attachmentid=250692&d=1440767119
منبع توضیحات سایت اعلان
ZBrush
ZBrush is a digital sculpting tool that combines 3D/2.5D modeling, texturing and painting. It uses a proprietary "pixol" technology (see below) which stores lighting, color, material, and depth information for all objects on the screen. The main difference between ZBrush and more traditional modeling packages is that it is more akin to sculpting.ZBrush is used for creating high-resolution models (able to reach 40+ million polygons) for use in movies, games, and animations, by companies ranging from ILM to Electronic Arts. ZBrush uses dynamic levels of resolution to allow sculptors to make global or local changes to their models. ZBrush is most known for being able to sculpt medium to high frequency details that were traditionally painted in bump maps. The resulting mesh details can then be exported as normal maps to be used on a low poly version of that same model. They can also be exported as adisplacement map, although in that case the lower poly version generally requires more resolution. Or, once completed, the 3D model can be projected to the background, becoming a 2.5D image (upon which further effects can be applied). Work can then begin on another 3D model which can be used in the same scene. This feature lets users work with complicated scenes without heavy processor overhead.ZBrush was developed by the company Pixologic Inc, founded by Ofer Alon (also known by the alias "Pixolator") and Jack Rimokh. The software was presented in 1999 at SIGGRAPH. The demo version 1.55 was released in 2002, and the version 3.1 was released in 2007. ZBrush 4 for Windows and Mac systems was announced on April 21, 2009 for an August release, but was later postponed. Version 3.5 was made available in September the same year, and includes some of the newer features initially intended for ZBrush 4.[1Through GoZ ("Go ZBrush"), available in Version 4, ZBrush offers integration with Autodesk Maya, Autodesk 3ds Max, Cinema4D, LightWave 3D, Poser Pro, Daz
Studio, EIAS and Modo.
.PixolLike a pixel, each pixol contains information on X and Y position and color values. Additionally, it contains information on depth (or Z position), orientation and material. ZBrush related files store pixol information, but when these maps are exported (e.g., to JPEG or PNG formats) they are flattened and the pixol data is lost.[3] This technique similar in concept to a voxel, another kind of 3D pixel.
FeaturesZBrush comes with many features[4] to aid in the sculpting of models and meshes.
3D BrushesThe initial ZBrush download comes with 30 3D sculpting brushes with more available for download. The brushes come with many attributes pertaining to them, including hardness, different stroke types, and alphas, which apply a shape to the stroke.
PolypaintPolypainting allows users to paint on an object's surface without the need to first assign a texture map by adding color directly to the polygons.
IllustrationZBrush also gives the ability to sculpt in 2.5D, and comes with several brushes for that purpose. A pixol put down when sculpting or illustrating in 2.5D contains information on its own color, depth, material, position, and lighting information.
TransposeZBrush also has a feature that is similar to skeletal animation in other 3D programs. The transpose feature allows a user to isolate a part of the model and pose it without the need of skeletal rigging.
ZSpheresA user can create a base mesh with uniform topology and then convert it into a sculptable model by starting out with a simple sphere and extracting more "ZSpheres" until the basic shape of the desired model is created.
GoZ

GoZ tab in Autodesk Maya's shelf.
Introduced in ZBrush 3.2 OSX, GoZ automates setting up shading networks for normal, displacement, and texture maps of the 3D models in GoZ-enabled applications. Upon sending the mesh back to ZBrush, GoZ will automatically remap the existing high-resolution details to the incoming mesh.[2] GoZ will take care of operations such as correcting points & polygons order. The updated mesh is immediately ready for further detailing, map extractions, and transferring to any other GoZ-enabled application.[5]
Best Preview Render
Also included is a full render suite known as Best Preview Render, which allows use of full 360° environment maps to light scenes using HDRI images. BPR includes a new light manipulation system called LightCaps. With it, one can not only adjust how the lights in the scene are placed around the model, but also generate environments based on it for HDRI render later on. It also allows for material adjustments in a realtime. Material properties such as subsurface scattering are supported as are environmental and scan-line reflections.BPR also includes a set of built-in filters that can be used in realtime to create dramatic effects and corrections without even touching another photo-manipulation program.
DynaMeshAllows ZBrush to quickly generate a new model with uniform polygon distribution, to improve the topology of models and eliminate polygon stretching.
FibermeshFibermesh is a feature that allows users to grow polygon fibers out of their models or to make various botanical items. It is also a way to edit and manipulate large amounts of polygons at once with Groom brushes.
ZRemesher
An automatic retopology system previously called QRemesher that creates new topology based on the original mesh. The new topology is generally more clean and uniform. This process can also be guided by the user to make the new topology follow curves in the model and retain more detail to specified areas.
en.wikipedia.org
آموزش نرم افزار ZBrush
آموزش Zbrush از برترین نرم افزارهای تولید مدل های سه بعدی و ساخت بافت ها یا Texture ها در قالب آموزش مالتی مدیا به مدت 6.5 ساعت از کمپانی Lynda ارائه شده
نرم افزار Zbrush چیست ؟
این نرم افزار از بهترین برنامه های دیجیتالی ترسیم و ایجاد مدل های سه بعدی ، بافت ها و حتی نقاشی می باشد ، از Zbrush به منظور ساخت مدل های سه بعدی Resolution بالا استفاده می گردد .
در ادامه به معرفی سرفصل های درسی این مجموعه آموزش Zbrush می پردازیم :
معرفی
خوش آمد گویی
آشنایی با نحوه استفاده از فایل های تمرینی
آموزش Interface نرم افزار Zbrush
آموزش و آشنایی با Pixol
آموزش تنظیم اندازه Canvas ها و رنگ ها در Zbrush
آموزش مکان دهی به آبجکت های سه بعدی
آموزش کار با Tray ها و پالت ها در نرم افزار Zbrush
آموزش شکل دهی به مدل ها در مد ویرایش
آموزش استفاده مناسب از براش های Sculpting و یا همان شکل دهی به آبجکت ها
آموزش ذخیره سازی مدل های ساخته شده
آموزش مدیریت حافظه در ZBrush
آموزش تنظیم صحیح ویژگیهای محیط نرم افزار ZBrush
آموزش کارکردن روی مدل های سه بعدی
آموزش شخصی سازی startup 3D meshes
آموزش ویرایش و اصلاح مجدد مدل های سه بعدی
Activating symmetry
آموزش آرماتور بندی مدل سه بعدی توسط ZSphere و یا Creating armatures with ZSphere
آموزش تنظیم آرماتور ها توسط ZSphere
آموزش پرداخت بیشتر جزئیات مدل ساخته شده در مراحل قبلی
Masking geometry
Hiding and showing polygons
آموزش گروه بندی geometry توسط polygroup ها
آموزش Extrude نمودن geometry ها توسط حلقه های edge به منظور ایجاد گردن و گوش
آموزش ایجاد گوشه های زبر توسط ابزار Crease
آموزش افزودن بخش های بیشتر به مدل توسط زیر ابزارها
آموزش مکان دهی به مدل ها بوسیله ابزار Transpose بخش اول
آموزش نصب پلاگین Subtool
آموزش مکان دهی به مدل ها بوسیله ابزار Transpose بخش دوم
آموزش نصب Transpose Master Plugin
آموزش حجاری دیجیتال
آموزش حجاری با براش ها
آموزش انتخاب stroke types در نرم افزار ZBrush
آموزش کاربرد ماوس Lazy
آموزش ایجاد جزئیات توسط Alpha
آموزش ایجاد Alpha ها
آموزش ایجاد stencils از Alpha
آموزش دخیره سازی morph targets
ایزوله نمودن جزئیات با لایه های سه بعدی
آموزش ایجاد Surface ها بوسیله extract نمودن mesh ها
آموزش کاربرد رنگ ها ، بافت ها و ماتریال ها
آموزش انتخاب رنگ
آموزش اعمال بافت ها
آموزش ایجاد بافت های بدون سیم
آموزش ترسیم مدل ها در نرم افزار ZBrush
آموزش Mapping 3D model texture coordinates
آموزش افزودن منابع حجاری
آموزش اعمال متریال ها
Modify نمودن ماتریال های استاندارد
آموزش اعمال ماتریال های MatCap
آموزش ایجاد ماتریال های MatCap
آموزش ایجاد نقشه های Bump
آموزش ترسیم با تصاویر
آموزش کاربرد ZBrush Sculpt ها در دیگر نرم افزار های 3D
آموزش Export مدل ها از ZBrush
آموزش Import مدل ها به ZBrush
Illustrating with ZBrush
آموزش شروع به کار با ابزار های 2.5 بعدی
آموزش ویرایش Paintbrush ها با استفاده از Stroke types
Positioning strokes and models on the canvas
آموزش کاربرد Snapshot ها
آموزش مفاهیم ZSub و ZCut
آموزش ایجاد لایه های سند
آموزش اعمال Transparency
Lighting the canvas
آموزش رندر کردن در نرم افزار ZBrush
آموزش Tune نمودن سایه ها
Baking lighting into the graphic
Creating a sense of depth using fog
Movies, Macros, and ZScripts
آموزش ضبط نمودن ویدیوهای ZBrush
آموزش macros and ZScripts
آموزش برخورد با 14 تله برای تازه کاران
نمی توانم مدل را حرکت دهم و یا آن را بچرخانم
نمی توانم روی مدل را حجاری کنم
نمی توانم lighting را تنظیم نمایم
نمی توانم Stroke های Hide شده را کنترل کنم
Can't move objects smoothly with the Gyro
نمی توانم مدل ها را بر روی Canvas حرکت دهم
نمی توانم بخشی از مدل را حرکت دهم
Can't subdivide the model
Can't control the pivot of the model
Can't maintain symmetry
نمی توانم زیر ابزارها را کنترل نمایم
Can't rotate with Transpose without distorting the model
Can't activate the Transpose tool
Can't get rid of blurriness on the mask
و ده ها آموزش کاربردی دیگر
زبان آموزش ها انگلیسی روان و ساده
پیوست ها
-
 JFK_Closeup-930x1024.jpg23.3 کیلوبایت · بازدیدها: 0
 -
 3-770x1024.jpg27.2 کیلوبایت · بازدیدها: 0
 -
 MapMakingOf_1200-1024x561.jpg35.7 کیلوبایت · بازدیدها: 0
 -
 projected-1024x377.jpg22.5 کیلوبایت · بازدیدها: 0
آخرین ویرایش: